- TOSIZE.it
- Do it yourself
- DIY Projects
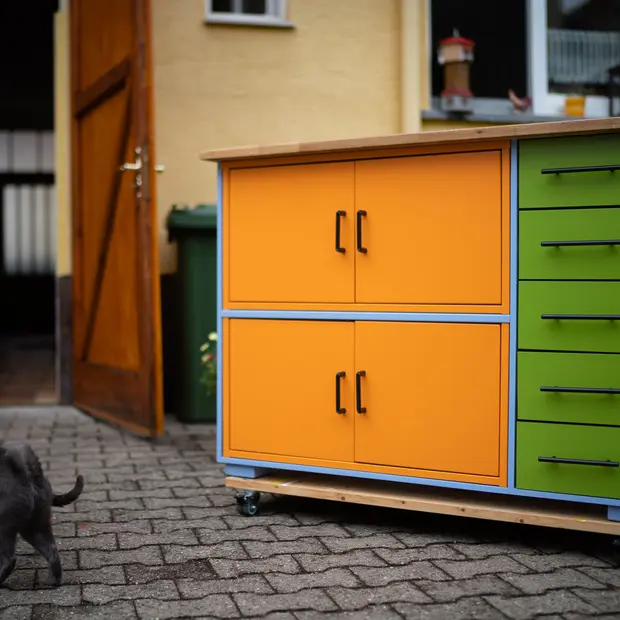
Multifunctional children's furniture with bookshelf, by Gastouderopvang Rups en Co
Multifunctional children's furniture with bookshelf, by Gastouderopvang Rups en Co
Create this project yourself with sheet material cut to size by TOSIZE.it!
Average
5 minutes
Description
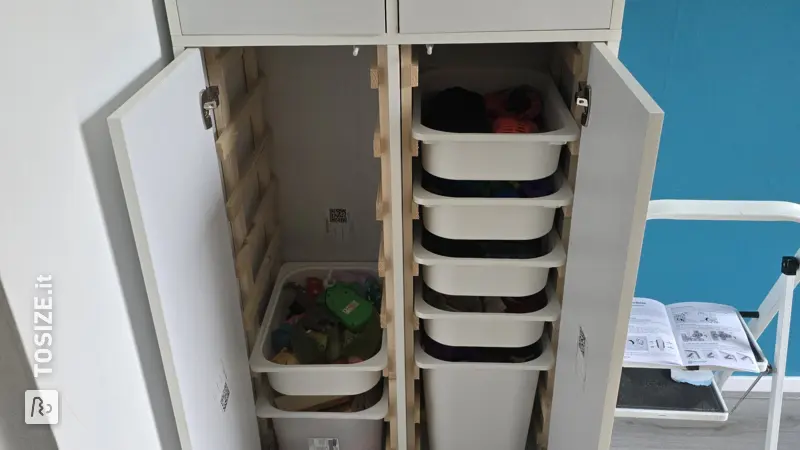
Toy storage unit on wheels for IKEA bins with space for activity boards at the back. Kitchenette on wheels with drawers from IKEA bins and a bookcase at the back.
Work description: how did you realise your project?
I chose to paint everything first and then assemble it, but you can of course assemble everything first, fill the screw holes and then paint everything.
1. Round off the corners of the parts where necessary using a router.
2. Cut slats measuring 15.0 x 15.0 x 270.0 cm at a 45° angle on one side to a length of 415 mm. You will need 16 pieces for the storage cupboard and 8 pieces for the kitchenette.
3. Sand and paint all parts.
4. Pre-drill the planing strips and attach them at the correct height, 7 mm from the front of the side walls and partition wall, using 3.0 x 25.0 screws (see photo 4).
For Toy Storage:
- Top of top slat 22 mm from top of side wall/partition wall;
- Top of second batten 110 mm from top of first batten;
- Top of the third and subsequent battens at 240 mm from the top of the battens above (see also drawing).
For kitchenette:
- Top of top slat at 338 mm from bottom of side wall/partition wall;
- Top of second batten 110 mm from top of first batten.
5. Secure the swivel castors with brakes at the front, 80 mm from the side and 30 mm from the front, using M8 carriage bolts.
6. Secure the swivel castors at the rear 50 mm from the side and 30 mm from the rear using M8 x 30 carriage bolts.
7. Mark the position of the MDF screws on the outside of the side walls.
8. To mount the rear panel 66 mm from the back of the side panel, use 5 screws in a vertical line. The first and last screws should be 100 mm from the top/bottom. The distance between the screws should be 160 mm.
Extra for kitchenette/bookcase:
- To mount the worktop (kitchenette) 369 mm from the bottom of the side wall, use 4 screws in a horizontal line. The first screw should be 40 mm from the front, with 120 mm between screws.
- For mounting the bookshelves: 4 screws on a vertical line 9 mm from the back at 30 mm, 350 mm, 555 mm, 710 mm from the bottom of the side wall.
- For mounting the bookshelves: 3 screws on a vertical line 35 mm from the back at 305 mm, 515 mm, 685 mm from the bottom of the side wall.
9. Mark the position of the screws on the top plate and bottom plate.
- To attach the side panels in a line 9 mm from the side: 5 screws. The first and last screws should be 30 mm from the front/back, with a distance of 110 mm between the screws (3 screws for the top panel of the kitchenette).
- To secure the rear panel, use 5 screws in a line 66 mm from the rear edge. The first and last screws should be 50 mm from the side, with a distance of 140 mm between the screws.
- To secure the partition wall, use four screws in a line 337 mm from the side. The first screw should be 30 mm from the front, with a distance of 110 mm between screws. Please note that for the kitchenette, these should only be placed in the base plate.
- Extra for kitchenette/bookcase:
- To attach the bottom shelf to the base, use four screws in a line 9 mm from the back. The first and last screws should be 100 mm from the side, with a distance of 160 mm between the screws.
10. Mark the position of the screws on the back wall of the kitchenette/bookcase.
- To secure the partition wall in a vertical line 319 mm from the side, use 4 screws. The first screw should be 30 mm from the bottom and 105 mm between screws.
11. For kitchenette/bookcase: screw the shelves for the bookcase onto the bottom of the bookcase. Four screws in a line 9 mm from the back of the bottom shelf.
12. Mark the position of the rear wall on the inside of the side walls. Screw the rear wall to the side walls at a distance of 57 mm from the rear of the side walls.
13. Screw the base to the side walls and rear wall.
14. Screw the top plate to the side walls and rear wall.
15. Mark the position of the partition wall on the inside of the base and top plate (for kitchenettes on the base and rear wall) and assemble.
Further for kitchenette/bookshelf:
16. Mark the position of the kitchenette worktop on the inside of the side walls and assemble. The bottom of the worktop should be 360 mm from the top of the base.
17. Mark the position of the bookshelves on the inside side walls and assemble them. Bottom bookshelf on the base, 2nd with bottom at 295 mm, 3rd with bottom at 505 mm, 4th with bottom at 675 mm from the top of the base.
18. Make hotplates from old CDs or wood and stick them onto the worktop.
If necessary, install a tap. Stick a plexiglass mirror to the back wall.
Final format: What are the external dimensions?
67,4(b)x 50,0(d) x 94,0(h)cm
Tip! Also check out our handy DIY tips!
What now?
This is a project for inspiration. Because our assortment has changed, (some of) the products are no longer available.
View all sheet materials